Before using Positif you need to calibrate your camera scanning system. The easiest way to do this is by using Positif Calibration Target. The target includes an empty frame and a Color Patches frame. The empty frame is used to configure your camera settings before the actual calibration is performed with the Color Patches frame.
Most camera manufacturers provide software suites for remotely controlling (tethering) the camera. Usually, it is more convenient and faster to operate the camera remotely through such software than navigating the camera menus.
The calibration procedure includes five steps:
A typical scanning system would usually require the following preparatory steps:
Consult your camera instruction manual on how to set custom white balance. Use empty frame from the Calibration Target to set the white balance point. If you use a variable color temperature light source you might want to set it to a high color temperature setting (cold light) to decrease exposure time. Adjust exposure if required. For this step it is safer to underexpose. Overexposure and clipping will result in wrong white balance settings.
When the custom white balance is properly set and applied the empty frame should appear as a neutral grey image. Save this setting and use it for all subsequent scans.
The next step is choosing the optimal exposure for scanning. The camera should be in the Aperture Priority mode, as in the previous step. Use the empty frame again and adjust the shutter speed such that the average exposure of the empty frame is about 1/2 or a full stop below clipping. A histogram plot of your remote control software or in-camera histogram display can be useful for estimating exposures.
Once you are happy with your exposure settings, take a note of the color temperature of your light source (if adjustable), white balance point in degrees Kelvin, ISO speed, aperture setting and exposure time and keep them for future reference.
Without changing the camera settings take an image on the clear (Film Base) frame. If you use Auto Focus and the camera struggles with finding the focus distance switch to Manual Focus mode. You might also try putting a few small crosses on the negative using an ink pen or pencil that your camera can use to focus the lens.
Transfer the image to your computer and save in a location where you can easily find it.
Advance the Calibration Target to the next frame containing 24 color patches and take an image of the Color Checker frame. Transfer the image to your computer and save in the same directory as your Film Base image. Copy a CSV file with measured Status M densities of your Color Checker negative in the same location.
Start Positif. If you see a warning about the absence of calibration data ignore it, we are going to fix this in a moment. Click the "New Calibration" button in the upper right corner of the program window to open the Calibration View.

First, enter a name for the calibration set. It is a good idea to include the camera make and model, lens, light source and film stock of the Calibration Target in case you decide to use a different configuration later.

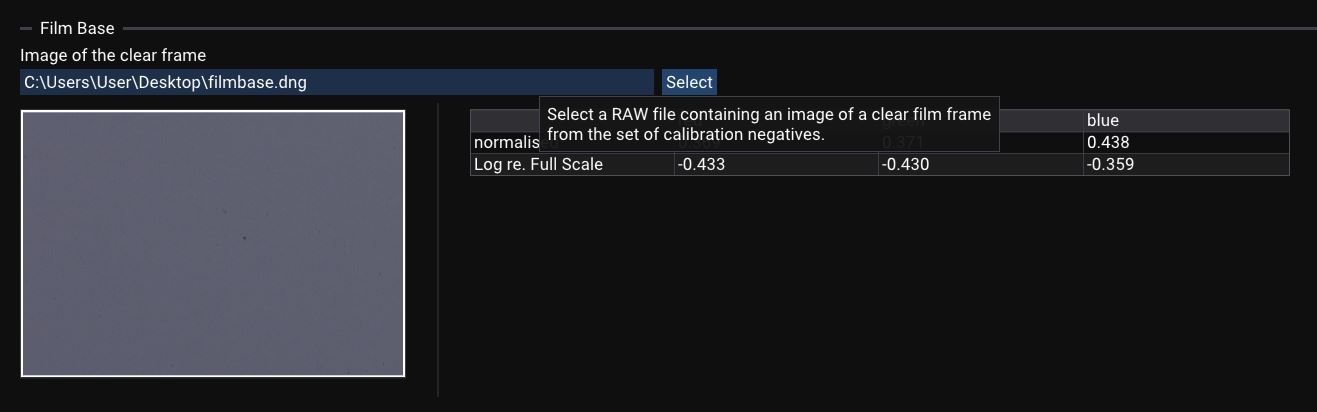
Next, type the path to the clear frame (Film Base) image you saved at the previous step or use the Select button to locate this file. After processing the image Positif will display a table with normalized red, green and blue values for the film base. If you set up your camera correctly these values should be roughly equal and fall in the range of 0.4 to 0.8.
In the Calibration Target section that appears below provide the path for the RAW file with the image of the Calibration Target and the CSV file with the measured densities. From the Film Stock dropdown list select the film used to produce the Calibration Target.
Processing the file can take a few seconds. Upon completing the calculations the image of the Calibration Target with detected color patches will be displayed together with a table containing uncalibrated, reference and calibrated values for the red, green and blue channels. Density calibration errors and color difference statistics is provided in the corresponding tables on the right of the panel.
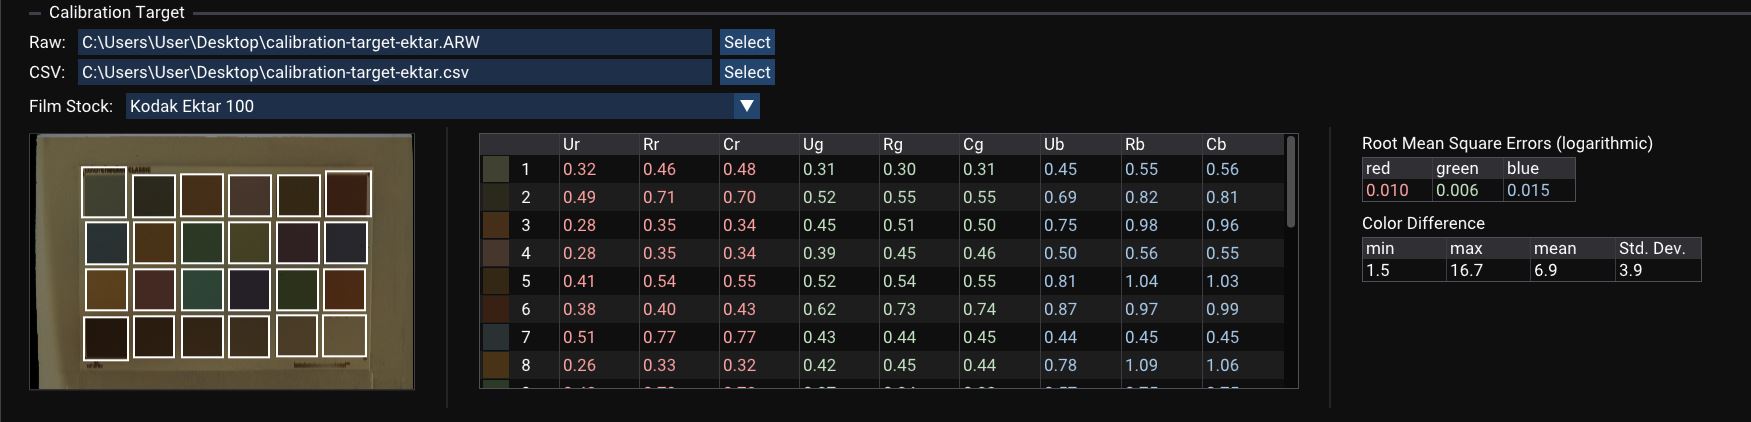
Calibration errors should be close to the uncertainty of Status M measurements (below 0.03). Errors exceeding 0.05 usually indicate a problem with the calibration procedure.
Color difference is calculated in ΔEab using CIE76 equation (L2 norm of the difference in CIELAB color space). The mean color difference for common negative films is expected to be below 10.
To complete the calibration and save the results click the corresponding button at the bottom of the page.