Download Positif installer (Windows), disk image (macOS) or package (Linux). The installation instructions are specific to your operating system.
Run the installer and follow the usual installation steps. The software is installed in the current user folder. It is recommended to use the default location.
Click on the downloaded DMG file and drag the Positif icon into the Applications folder.

You are likely to get an error message saying that "positif cannot be opened because the developer cannot be verified". To fix this, Control+click on the application in Finder and choose Open.
Depending on your Linux distribution you will need either the .DEB package (Debian, Ubuntu, Mint, etc.) or .RPM (Fedora, CentOS, Red Hat).
Debian packages can be installed from the terminal by running the following command:
sudo dpkg -i positif*.deb
For RPM packages run:
sudo rpm -i positif*.rpm
If you prefer to use your Linux Desktop to install Positif you can do this by right-clicking on the downloaded package and selecting "Open with Software Install" or something similar. The instructions are specific for Desktop Managers and distributions, so please consult the documentation on your operating systems for more details.
Before using Positif you need to calibrate your camera scanning system. The easiest way to do this is by using Positif Calibration Target. The target includes an empty frame and a Color Patches frame. The empty frame is used to configure your camera settings before the actual calibration is performed with the Color Patches frame.
Most camera manufacturers provide software suites for remotely controlling (tethering) the camera. Usually, it is more convenient and faster to operate the camera remotely through such software than navigating the camera menus.
The calibration procedure includes five steps:
A typical scanning system would usually require the following preparatory steps:
Consult your camera instruction manual on how to set custom white balance. Use empty frame from the Calibration Target to set the white balance point. If you use a variable color temperature light source you might want to set it to a high color temperature setting (cold light) to decrease exposure time. Adjust exposure if required. For this step it is safer to underexpose. Overexposure and clipping will result in wrong white balance settings.
When the custom white balance is properly set and applied the empty frame should appear as a neutral grey image. Save this setting and use it for all subsequent scans.
The next step is choosing the optimal exposure for scanning. The camera should be in the Aperture Priority mode, as in the previous step. Use the empty frame again and adjust the shutter speed such that the average exposure of the empty frame is about 1/2 or a full stop below clipping. A histogram plot of your remote control software or in-camera histogram display can be useful for estimating exposures.
Once you are happy with your exposure settings, take a note of the color temperature of your light source (if adjustable), white balance point in degrees Kelvin, ISO speed, aperture setting and exposure time and keep them for future reference.
Without changing the camera settings take an image on the clear (Film Base) frame. If you use Auto Focus and the camera struggles with finding the focus distance switch to Manual Focus mode. You might also try putting a few small crosses on the negative using an ink pen or pencil that your camera can use to focus the lens.
Transfer the image to your computer and save in a location where you can easily find it.
Advance the Calibration Target to the next frame containing 24 color patches and take an image of the Color Checker frame. Transfer the image to your computer and save in the same directory as your Film Base image. Copy a CSV file with measured Status M densities of your Color Checker negative in the same location.
Start Positif. If you see a warning about the absence of calibration data ignore it, we are going to fix this in a moment. Click the "New Calibration" button in the upper right corner of the program window to open the Calibration View.

First, enter a name for the calibration set. It is a good idea to include the camera make and model, lens, light source and film stock of the Calibration Target in case you decide to use a different configuration later.

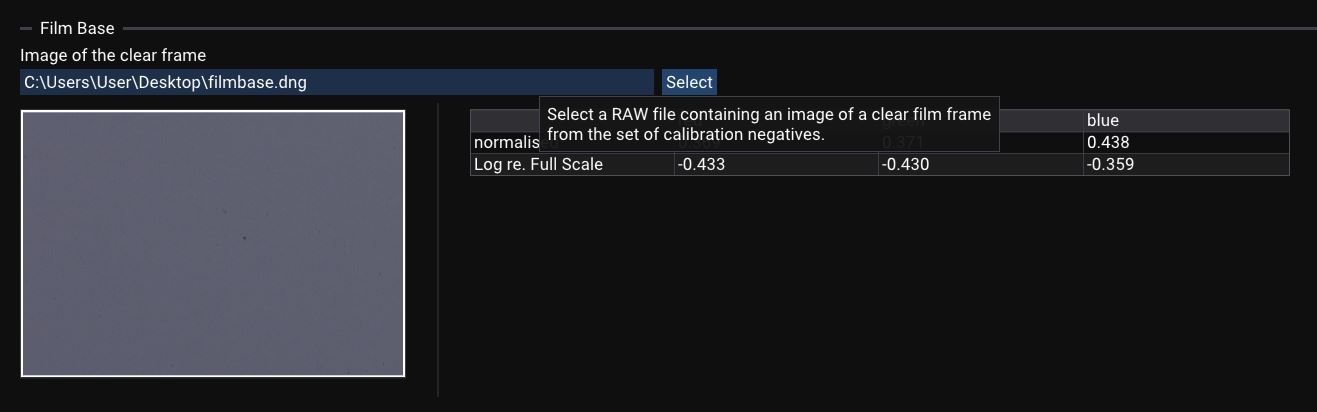
Next, type the path to the clear frame (Film Base) image you saved at the previous step or use the Select button to locate this file. After processing the image Positif will display a table with normalized red, green and blue values for the film base. If you set up your camera correctly these values should be roughly equal and fall in the range of 0.4 to 0.8.
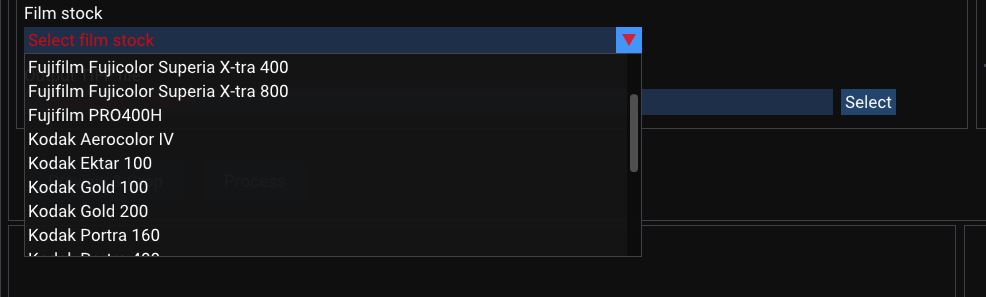
In the Calibration Target section that appears below provide the path for the RAW file with the image of the Calibration Target and the CSV file with the measured densities. From the Film Stock dropdown list select the film used to produce the Calibration Target.
Processing the file can take a few seconds. Upon completing the calculations the image of the Calibration Target with detected color patches will be displayed together with a table containing uncalibrated, reference and calibrated values for the red, green and blue channels. Density calibration errors and color difference statistics is provided in the corresponding tables on the right of the panel.
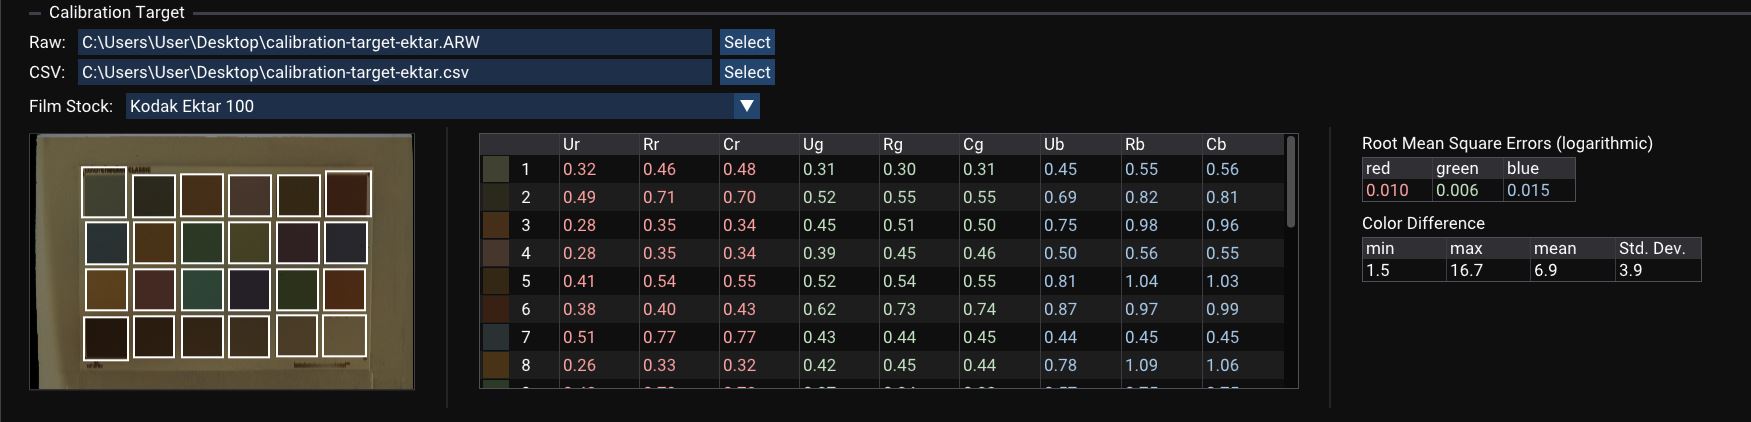
Calibration errors should be close to the uncertainty of Status M measurements (below 0.03). Errors exceeding 0.05 usually indicate a problem with the calibration procedure.
Color difference is calculated in ΔEab using CIE76 equation (L2 norm of the difference in CIELAB color space). The mean color difference for common negative films is expected to be below 10.
To complete the calibration and save the results click the corresponding button at the bottom of the page.
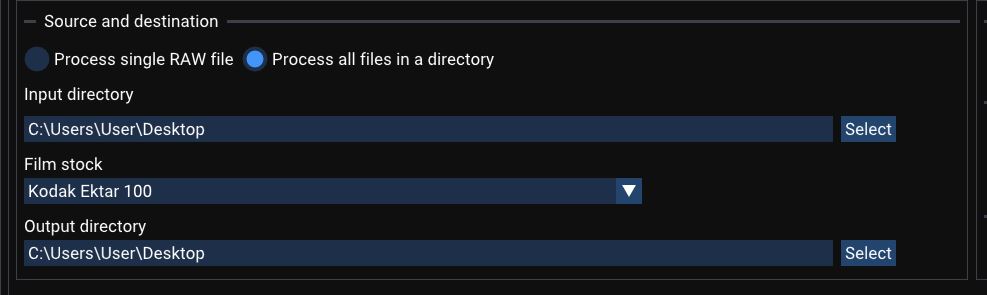
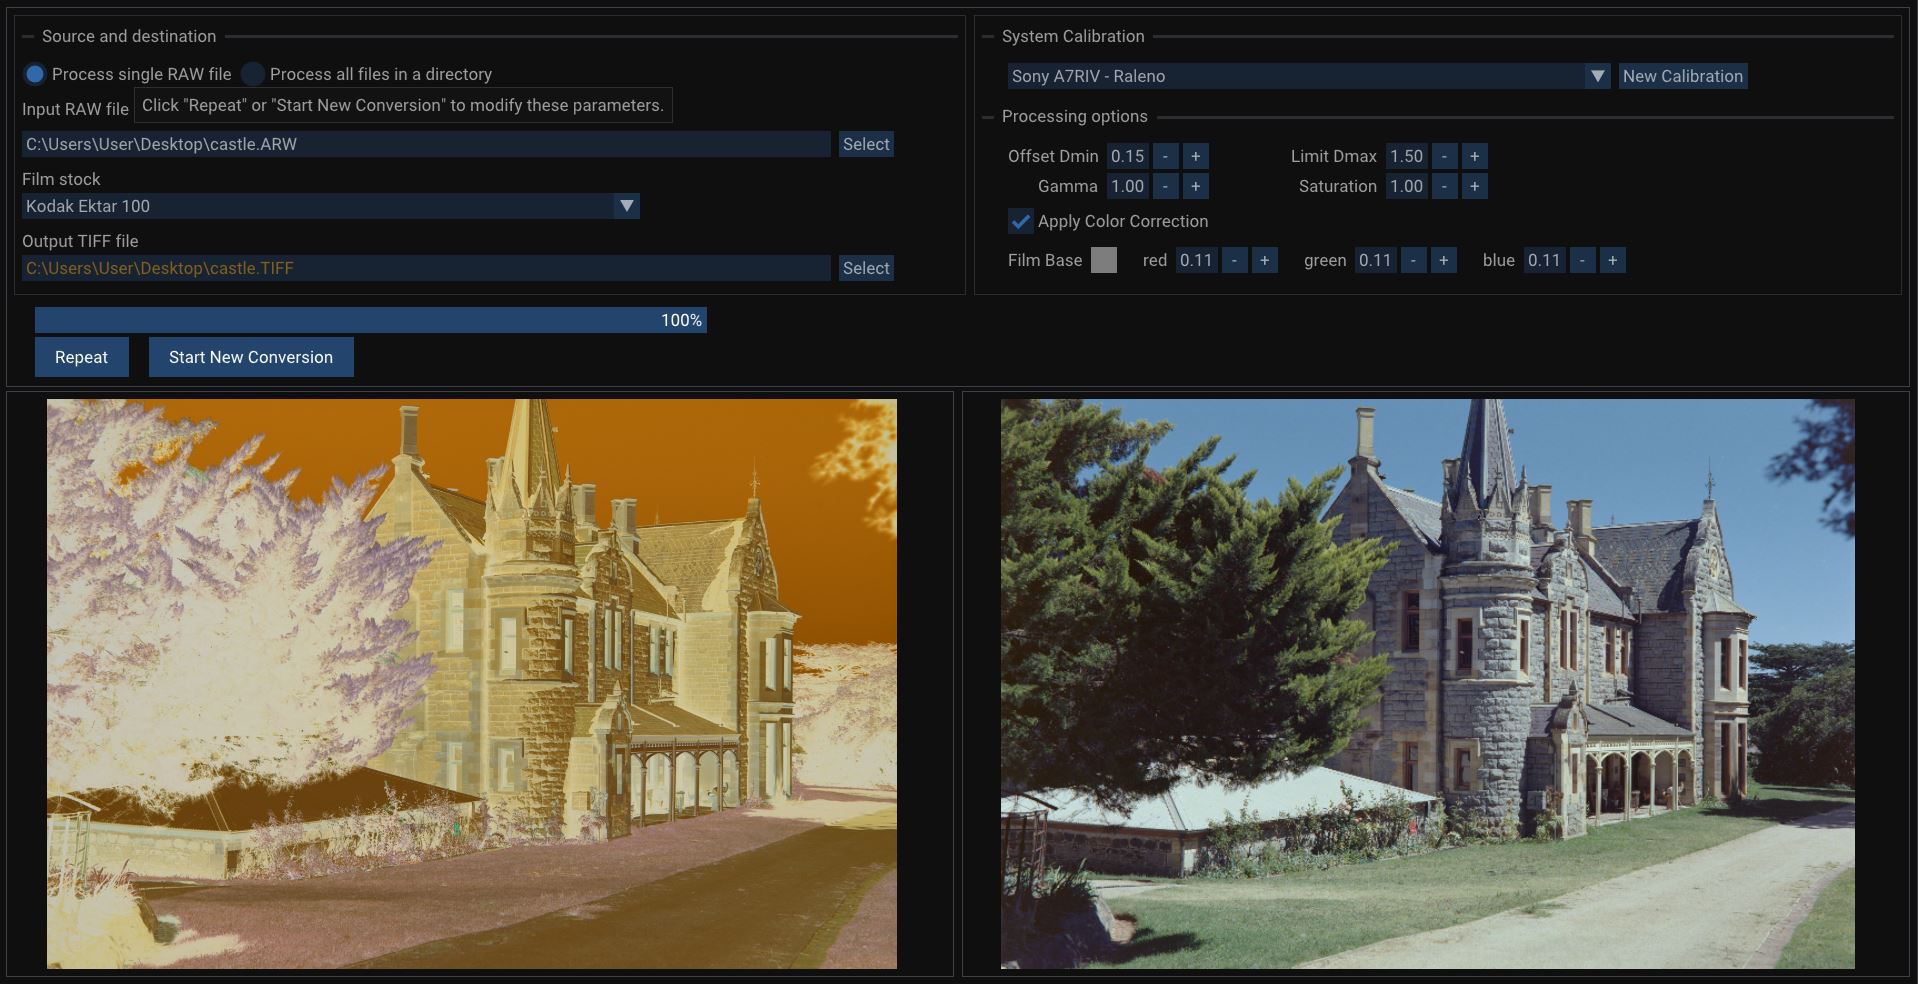
Positif can be used to convert a single RAW image or in a batch-processing mode where all RAW files in a directory are converted using the same set of parameters. Use the radio button on the Source and Destination panel to switch between the two modes.

To convert a single file:


With batch processing you can convert a whole roll or even several rolls of the same film stock in one go. The operation takes some time, so it could be a good idea to convert a single frame first and fine-tune the parameters before processing the whole batch.
In a batch mode you specify the input directory, film stock and the output directory. The destination files have the same name as the input RAW files except for the TIFF extension.
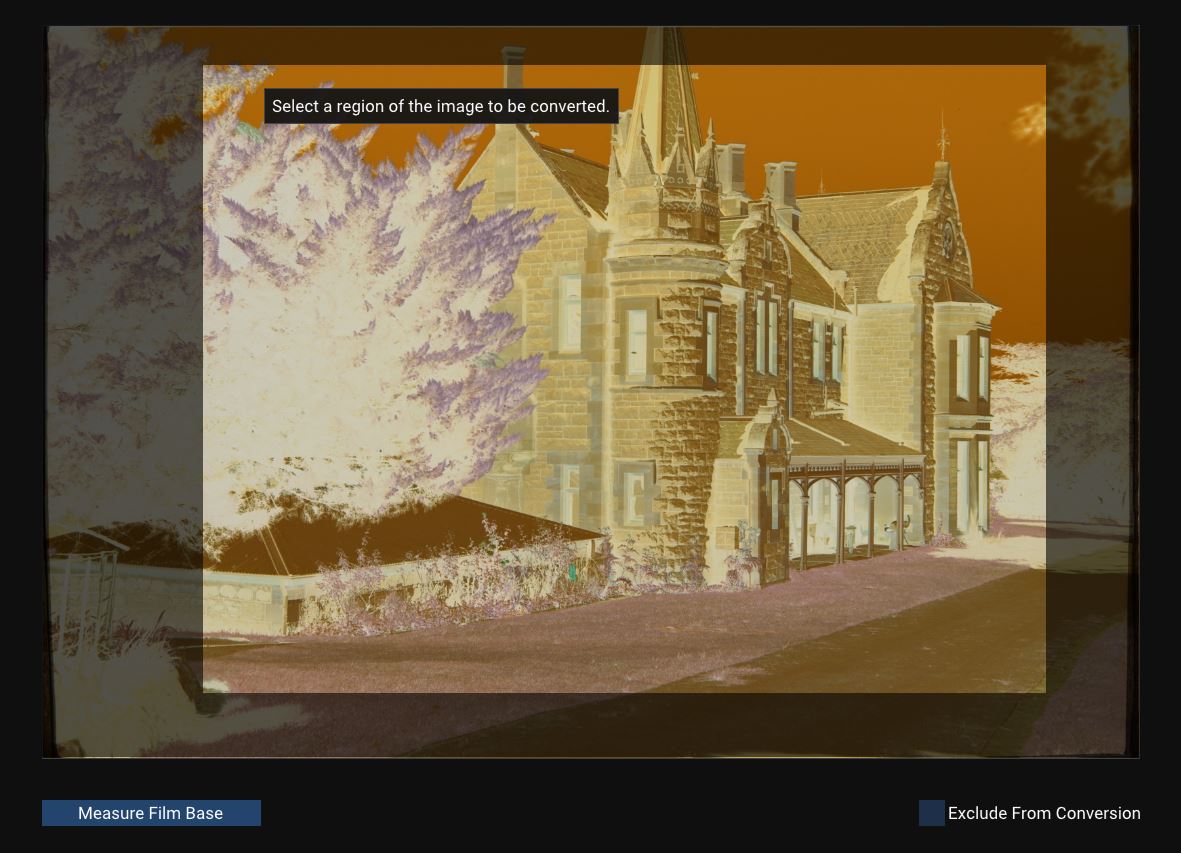
The Preview and Crop function is activated by clicking the corresponding button. It serves three purposes:

The functionality of Preview and Crop differs slightly in the single-file and batch-conversion modes.
In the batch processing mode the following controls are available on the preview and crop screen:

When the Exclude From Conversion option is checked the file is not converted and the Measure Film Base and cropping tools are disabled. Thus, film base measurements should be done before disabling file processing.
When processing a single file only the Measure Film Base button is available.
It is recommended to measure the normalized density of the film base plus fog for every roll of film you scan to take into account differences between film batches and variations in film processing.
Film base measurements are best made from a scan of a clear section of film at the start or the end of the roll or between the frames. When batch-processing the whole roll of film it is a good idea to take an extra image of the film base. This image can then be excluded from conversion.
To measure film base place the cursor to the area of clear film base and while holding the mouse button drag the cursor to select the region. Repeat if required. If you know the RGB densities from previous measurements you can manually enter them using the controls below the image. The same controls are duplicated on the main program window.
Film base plus fog densities are measured in negative logarithmic units relative to the maximum 16-bit pixel value (65535).
When a single image is converted and the scan does not have unexposed areas of film, you can first open another image containing an area of film base, measure it, and then open the scan you wish to convert. The film base density will persist.
If you set up your scanning system as described in the Calibration section the default film base densities of 0.1 for the red, green and blue channels would provide a good starting point.
Optimal values for the film base are between 0.3 and 0.1. If your densities are higher your camera-scanned image is underexposed and the converted positive image might have poor resolution in the highlights. Conversely, low densities close to 0 indicate overexposure during scanning. Some film base pixels could be clipped resulting in incorrect film base density. Density change of 0.3 corresponds to one stop of camera exposure. For example, if you scanned a negative with the shutter speed of 1/30 s and the measured film density was 0.4 you might want to increase the shutter speed by one stop to 1/15 s to better utilize the dynamic range of your camera.
If the densities of the red, green and blue channels differ by more than 0.1 you might want to readjust your white balance point as described in the Setting White Balance section. This is required when scanning mask-less films like Kodak Aerocolor IV.
After completing the film base measurements click the Done button to return to the Preview and Crop window.
The image can be cropped before conversion. This saves some disk space when scanning square negatives with a 3:4 ratio full-frame camera. Please keep in mind that the crop region is calculated from a preview image stored in the RAW file rather than the full-resolution image. This introduces a small error. Thus, it is recommended to leave some margins and do the final crop in your photo editing software.
To select image region to be processed click and hold down the mouse button, drag to define the conversion rectangle, and then release.
With the film base measurements and optional cropping complete, click the "Done" button confirm your changes or "Cancel" to reset them. You will return to the main window.
Parameters affecting the conversion process are located in a corresponding panel on the main window.
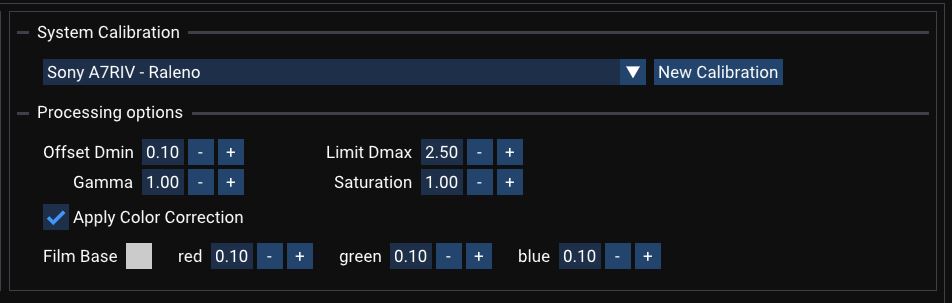
The most important is System Calibration. Please ensure that your system is properly calibrated, and the right calibration set is selected from the drop-down box. Please refer to the Calibration section for details on configuring your system and adding a new calibration.
There are four parameters in this panel: Minimum density offset; Maximum Density Limit; Gamma; and Saturation. The Apply Color Correction checkbox and the Film Base controls are also available.
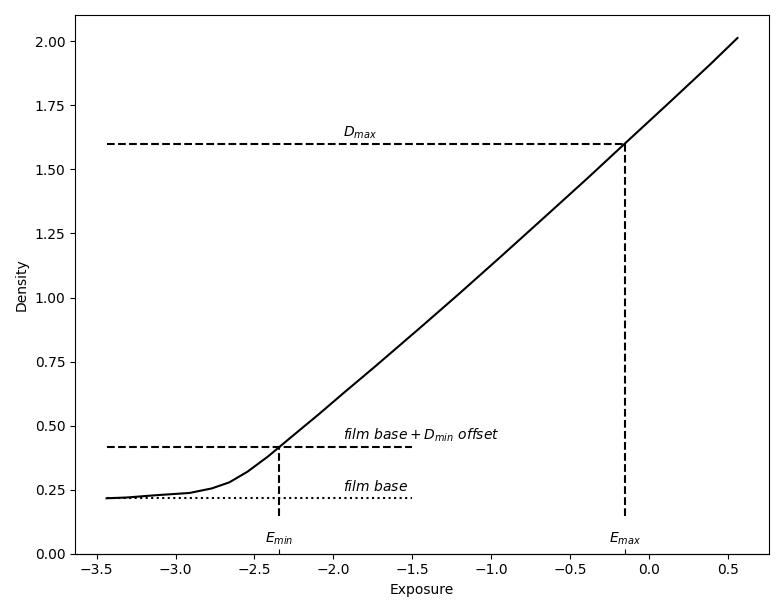
Offset Dmin defines the black point (Emin) of the converted positive image. It is added to the base-plus-fog density of the red channel. The resulting density is then used to find the black point exposure using the characteristic curve of the selected film stock. Offset Dmin is expressed in logarithmic units.
A well-exposed negative would have the darkest shadow about 0.1 density units above film base plus fog which is a default value. Usually, there is no need to change this value unless you are dealing with an underexposed negative or a scene with a high dynamic range.
You can change the value by typing the desired number in the text box, or using the up and down arrows next to it. To change the value in 0.1 steps hold down the Ctrl key.
The Dmax parameter defines the white point (Emax) of the converted image. The default value is somewhat conservative. If you are scanning an underexposed or low-dynamic range negative you probably want to lower Dmax. As an indication, the maximum red channel density on a well-exposed negative is somewhere around 1.2 to 1.5.
The Figure below illustrates how Offset Dmin and Dmax affect the dynamic range of the converted image by altering the black point Emin and the white point Emax. The curve in the figure is red channel characteristic curve of Kodak Portra 400.
The Gamma parameter is used to modify the contrast of the converted image. The default value of 1.0 (no adjustments) is usually adequate as most color negative films have sufficient contrast.
The Saturation parameter is used to modify the Saturation of the converted image. Unless you prefer a more saturated look, the default value of 1.0 (no adjustments) is recommended. Setting saturation to 0 produces a black-and-white image, though it will still be saved in three-channel RGB format and will need to be converted to true monochrome in photo-editing software.
As described in the How It Works section two transforms are applied to the scanned image during the conversion process. The first is mostly dependent on your light source and camera and is used to estimate Status M densities, while the second is used to improve color rendering after application of the film curve.
It is recommended to enable this option if the negative you are converting is shot on the same (or similar) film stock as the Calibration Target. Disable this option when converting discontinued film stocks for which Calibration Targets could no longer be made.
Film base plus fog density measured from the scan of the clear (unexposed) film section is displayed here. Use Measure Film Base in the Preview and Crop window to measure the normalized density of film base plus fog.
Click the Process button to start the conversion. A progress bar will be displayed showing the percent of completion. There is a lot of computations involved in the process, and it can take some time.
When the conversion completes you can choose to modify some parameters and repeat it. In this case the crop region is retained from the previous conversion. If, on the other hand, you click Start New Conversion the crop region will be reset. The parameters (Offset Dmin, Dmax, Gamma and Saturation) and the Film Base density keep their values after starting a new conversion.
The production of a color print from a negative is a complicated photochemical process that took several decades to perfect. In this technology the spectral and photographic characteristics of the negative film and the paper were matched and optimized to produce the best result.
The main problems in camera scanning arise from the mismatch in the spectral characteristics of the digital sensor, the color sensitive layers of the film, the color dyes formed during processing and the light source used for scanning. While all the relevant properties of the camera, the light source and the film are known or could be measured, their interaction is quite complex and the only practical approach to negative conversion consists in calibrating the scanning setup for each combination of the light source, camera, lens and the film stock. This is the route taken by Positif.
Two nonlinear transforms are used in the conversion process. The first is required to convert the raw RGB values of the negative captured by the camera to Status M densities. These densities are then converted to scene luminance levels using the film characteristic curve.
A second nonlinear transform is then applied to correct for the white balance and reduce color crossover. This transform is dependent on the film stock used both for calibration and capturing the image to be converted.
Positif relies on a simple calibration procedure to define both transforms. An image of the standard ColorChecker card is taken with a film camera. The processed negative is then measured with a Status M densitometer and the densities of each color patch are used to calculate the first transform.
Since the values of the ColorChecker patches in most popular color spaces (e.g. XYZ, L*a*b or sRGB) are known the second Color Correction Transform can be calculated in a similar fashion.
Thus, to calibrate a scanning system one would need to take an image of the ColorChecker card under full daylight and measure the Status M densities of each color patch of the resulting negative. A second unexposed frame comes in handy in configuring the scanning system and measuring film base plus fog densities. The two resulting frames are called a Calibration Target. The process of making one is not difficult but somewhat tedious. The Positif team is working on manufacturing Calibration Targets for common film stocks so that you do not have to make your own.